Fudgy Brownie Cookies Best of Both Worlds
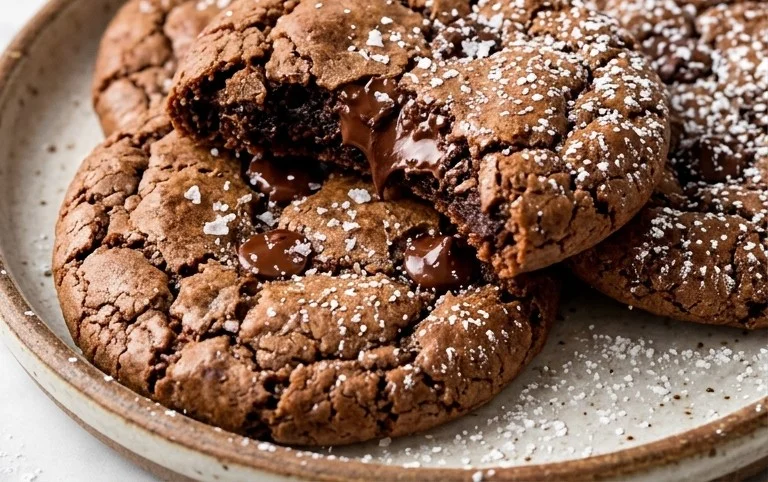
Brownie cookies are, in my humble opinion, one of the most brilliant dessert inventions of all time. They’re that magical intersection where the fudgy, decadent heart of a brownie meets the perfect chewy-crisp edge of a cookie. It’s the best of both worlds, all in one delightful bite. If you’re anything like me, the thought of biting into a truly exceptional brownie cookie is enough to make your mouth water. Why do we love them so much? It’s the intense chocolate flavor, the satisfying texture contrast, and the sheer indulgence they offer. What makes these particular brownie cookies so special? We’ve perfected a recipe that delivers that deeply rich, almost molten center while maintaining a lovely, slightly crisp perimeter. Get ready to experience brownie cookies like never before!

Brownie Cookies
Get ready to experience the best of both worlds with these incredible brownie cookies! If you’re a chocolate lover who can never decide between a rich, fudgy brownie and a chewy, satisfying cookie, this recipe is your answer. These treats deliver that deep, decadent chocolate flavor you crave from a brownie, with the delightful texture of a perfectly baked cookie. They’re wonderfully fudgy in the center and have a slightly crisp edge, making each bite an absolute dream. Whether you’re baking for a crowd or just treating yourself, these brownie cookies are sure to disappear in a flash. They’re surprisingly easy to make, requiring just a few simple steps to achieve brownie-like perfection in a cookie form.
Ingredients:
- 6 tbsp (84 g) unsalted butter
- 8 oz (227 g) chopped, dark chocolate (60% cocoa)
- 1/2 cup (63 g) all-purpose flour (spooned and leveled)
- 1/4 cup (20 g) cocoa powder, Dutch process
- 1/4 tsp salt
- 1 tsp baking powder
- 1/2 cup (100 g) white granulated sugar
- 1/4 cup + 2 tbsp (83 g) packed, light brown sugar
- 2 eggs, at room temperature
- 1 tsp vanilla
- flaky sea salt for sprinkling
Instructions:
1. Melting the Chocolate and Butter Base
The first and arguably most important step to achieving that signature brownie flavor and fudgy texture is to create a luscious chocolate base. In a medium, heatproof bowl, combine your chopped dark chocolate and unsalted butter. You can melt these together gently using a double boiler method. To do this, fill a saucepan with about an inch of water and bring it to a simmer over medium heat. Place the bowl with the chocolate and butter on top of the saucepan, ensuring the bottom of the bowl doesn’t touch the water. Stir occasionally until the butter is completely melted and the chocolate is smooth and glossy. This slow, gentle melting process prevents the chocolate from scorching, which can result in a bitter taste. Once fully melted and smooth, remove the bowl from the heat and let it cool slightly for about 5-10 minutes. This slight cooling is important before incorporating it with other ingredients, especially the eggs, to avoid scrambling them.
2. Combining Dry Ingredients
While your chocolate mixture is cooling, it’s time to prepare the dry ingredients. In a separate medium bowl, whisk together the all-purpose flour, Dutch-process cocoa powder, salt, and baking powder. Sifting these ingredients together is a great way to ensure there are no lumps of cocoa powder or baking powder and that everything is evenly distributed. This even distribution is key to achieving a consistent texture throughout your cookies. The Dutch-process cocoa powder, with its alkalized nature, contributes to a smoother, less bitter chocolate flavor and a deeper, richer color, which is ideal for that intense brownie experience. The baking powder will provide just a touch of lift, ensuring the cookies aren’t too dense, while the salt will enhance the overall chocolate flavor, making it pop.
3. Creaming Sugars and Incorporating Eggs
Now, let’s bring the wet ingredients together. In a large bowl, combine the white granulated sugar and the packed light brown sugar. Add the slightly cooled chocolate and butter mixture to the sugars. Using a whisk or an electric mixer on low speed, beat these together until well combined. You want the mixture to be smooth and slightly glossy. Next, add the eggs one at a time, beating well after each addition. Ensure each egg is fully incorporated before adding the next. Room temperature eggs emulsify better into the batter, creating a smoother, more cohesive dough. Finally, stir in the vanilla extract. The vanilla acts as a flavor enhancer, complementing and deepening the chocolate notes without overpowering them.
4. Folding in Dry Ingredients and Creating the Dough
Once the wet ingredients are thoroughly combined, it’s time to introduce the dry ingredients to the chocolate mixture. Gradually add the whisked dry ingredients to the wet ingredients. Use a spatula to gently fold them together until just combined. Be careful not to overmix at this stage. Overmixing can develop the gluten in the flour, leading to tougher cookies. You want to see just a few streaks of flour remaining before you stop mixing. The goal is to create a thick, fudgy dough that resembles brownie batter. It will be quite sticky, and that’s exactly what you’re looking for. This sticky, dense consistency is what gives these cookies their characteristic brownie-like chewiness.
5. Scooping, Baking, and Finishing Touches
Preheat your oven to 350°F (175°C) and line baking sheets with parchment paper. Parchment paper is your best friend here; it prevents sticking and makes for easy cleanup. Using a cookie scoop (about 1.5 to 2 tablespoons) or two spoons, drop rounded balls of dough onto the prepared baking sheets. Leave about 2 inches of space between each cookie as they will spread slightly. Gently press down on the tops of the dough balls with your palm or the back of a spoon to slightly flatten them. This helps them bake more evenly and achieve that desirable fudgy center. For the final touch that elevates these cookies from great to spectacular, sprinkle the tops of the unbaked cookies with a pinch of flaky sea salt. This contrast of sweet and salty is a classic pairing with chocolate and adds an irresistible crunch. Bake for 10-12 minutes, or until the edges are set and the centers still look slightly underbaked. They will continue to cook as they cool on the baking sheet. Let the cookies cool on the baking sheet for about 5-10 minutes before carefully transferring them to a wire rack to cool completely. This allows them to firm up properly without becoming brittle. Enjoy these utterly delightful brownie cookies!
Conclusion:
And there you have it! My ultimate guide to creating the most decadent, fudgy, and chewy brownie cookies you’ve ever tasted. This recipe is a winner because it perfectly balances the rich, intense flavor of a brownie with the delightful chewiness and satisfying texture of a cookie. The simplicity of the steps means anyone can achieve bakery-quality results right in their own kitchen. These brownie cookies are incredibly versatile. Enjoy them warm with a glass of cold milk for that classic comfort, or let them cool completely for a firmer, more portable treat. They also make fantastic additions to ice cream sundaes or crumbled over yogurt parfaits.
Don’t be afraid to get creative with variations! Fold in some chocolate chips for extra gooeyness, add a sprinkle of sea salt on top before baking to enhance the chocolate flavor, or even swirl in some peanut butter or caramel for a gourmet twist. I truly encourage you to give these brownie cookies a try. They are sure to become a new favorite in your baking repertoire!
Frequently Asked Questions:
Can I make these brownie cookies ahead of time?
Absolutely! Brownie cookies store exceptionally well. Once completely cooled, place them in an airtight container at room temperature for up to 3-4 days. They often taste even better the next day as the flavors meld.
What is the best way to store leftover brownie cookies?
For optimal freshness, store your cooled brownie cookies in an airtight container. If you want to maintain their chewiness, you can place a slice of bread in the container with them – the bread will absorb excess moisture and keep the cookies soft.
Can I freeze these brownie cookies?
Yes, freezing is a great option. You can freeze baked and cooled brownie cookies in a single layer on a baking sheet until firm, then transfer them to a freezer-safe bag or container. They’ll last in the freezer for up to 2-3 months. Thaw them at room temperature.
Brownie Cookies
Rich and fudgy brownie cookies with a slightly crisp edge.
Ingredients
-
6 tbsp unsalted butter
-
8 oz chopped, dark chocolate (60% cocoa)
-
1/2 cup all-purpose flour (spooned and leveled)
-
1/4 cup cocoa powder, Dutch process
-
1/4 tsp salt
-
1 tsp baking powder
-
1/2 cup white granulated sugar
-
1/4 cup + 2 tbsp packed, light brown sugar
-
2 eggs, at room temperature
-
1 tsp vanilla
-
flaky sea salt for sprinkling
Instructions
-
Step 1
Melt the butter and 8 oz chopped, dark chocolate (60% cocoa) together in a double boiler or microwave on low power in 30-second intervals, stirring until smooth. Let cool slightly. -
Step 2
In a medium bowl, whisk together the 1/2 cup all-purpose flour, 1/4 cup cocoa powder, 1/4 tsp salt, and 1 tsp baking powder. -
Step 3
In a large bowl, whisk together the 1/2 cup white granulated sugar and 1/4 cup + 2 tbsp packed, light brown sugar until combined. -
Step 4
Add the 2 eggs, one at a time, to the sugar mixture, whisking well after each addition. Stir in the 1 tsp vanilla. -
Step 5
Pour the slightly cooled chocolate mixture into the wet ingredients and whisk until just combined. Do not overmix. -
Step 6
Gradually add the dry ingredients to the wet ingredients, mixing until just incorporated. The dough will be thick and fudgy. -
Step 7
Chill the dough for at least 30 minutes. This helps prevent spreading. -
Step 8
Preheat oven to 350°F (175°C). Line baking sheets with parchment paper. -
Step 9
Scoop rounded tablespoons of dough onto the prepared baking sheets, leaving about 2 inches between cookies. -
Step 10
Bake for 10-12 minutes, or until the edges are set and the centers look slightly underbaked. They will continue to cook as they cool. -
Step 11
Sprinkle with flaky sea salt immediately after removing from the oven. Let cool on the baking sheets for a few minutes before transferring to a wire rack to cool completely.
Important Information
Nutrition Facts (Per Serving)
It is important to consider this information as approximate and not to use it as definitive health advice.
Allergy Information
Please check ingredients for potential allergens and consult a health professional if in doubt.


